BY LOGAN SCHLOSSER
STAFF WRITER
So I tend to recommend a lot of games when it comes to my reviews, but you actually need a system to play these on, right?! This is where this article comes in. Today I will be instructing you to the best of my abilities how to build your very own, top-of-the-line gaming machine. I chose to talk about PC gaming today because all of the games I recommend in my articles are available on the PC platform. So with that introduction out of the way, let’s get started!
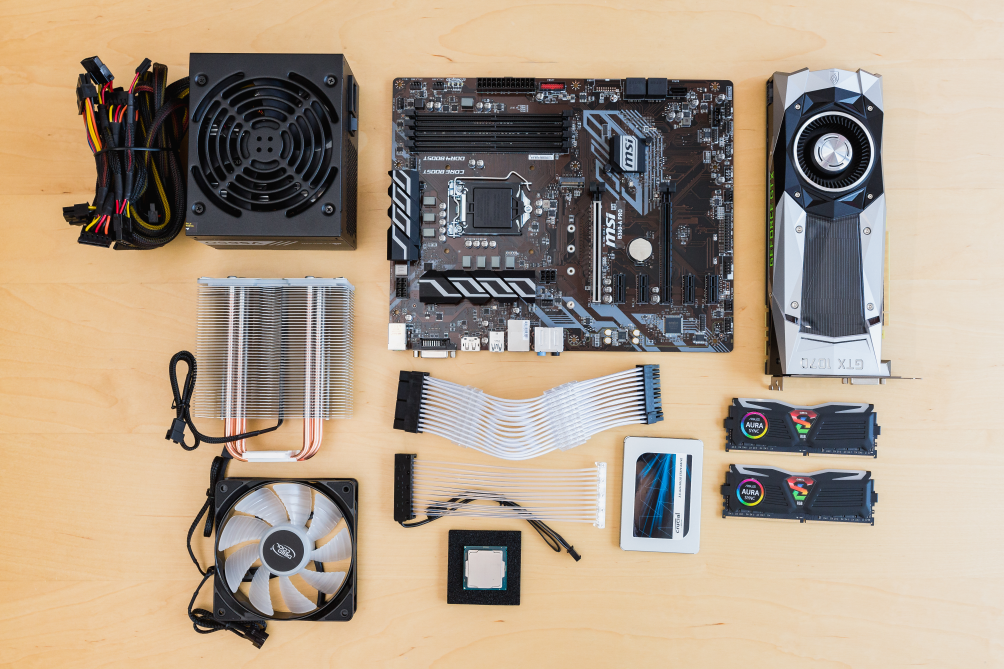
First off, let’s start out with the components. When building a PC, you have to learn what each component does first. So let’s start with the basics. Your CPU is essentially the brain of the computer, it handles the majority of the calculations required to actually run your PC. Next up, we have RAM or random access memory. RAM is essentially temporary storage; you ever wonder why Google Chrome is taking up so much of your RAM? It’s because it has to temporarily store the information of what tabs you have open and all of that. Then, we have your storage; storage can be in the form of two distinct types. First, we have hard disk storage. It’s what the majority of PCs have, and they are the cheapest ways of storing mass amounts of data. However, they have the flaw of being incredibly slow. This is where SSDs come in; they are a more expensive type of storage but are lightning-fast. When used as your boot drive, they can boot up your computer in as little time as 7 seconds.
Now, we have the case; the case is legitimately just where all of your parts get built into. This is one of the parts where you can justify buying one specifically on aesthetics. Further down our list of parts, the motherboard is up. The motherboard is essentially where all of the parts connect together and communicate with each other. By the end of your PC building process, every part in your computer should be connected to the motherboard. Now we have reached the power supply; the power supply is where all of your parts get their electricity from. All of the main components of your computer are all hooked up to this one part as well. Another cool component is the CPU cooler (get it? Cool, cooler?). Depending on what you pick out, the CPU cooler can either be a nice little fan or a massive block of metal on your processor. Finally, the moment you’ve all been waiting for: the graphics card! This is the part that carries all of your gaming and video rendering. Arguably, it is the most important (and expensive) part of any gamer’s PC. Now that you know all of the parts, let’s talk about actually choosing which ones you want.
The best way to choose your parts, in my opinion, is to use the website pcpartpicker.com. They have an extensive catalogue of every PC component ever made. Their main feature, however, is their PC builder. It is by far the best one for picking out your parts. While you are filling out the builder, it will tell you of any compatibility errors with the parts that you are planning on building with. Now when it comes to choosing your parts, you should do some research on the side to figure out what would support you best with what you want to do. If you just want to do some light gaming, you don’t really need the twelve thousand dollar graphics card you found online. However, if you do a heavy amount of VR gaming, or you are constantly playing top-of-the-line triple-A games, you might want to look into getting a beefier graphics card. What PC building boils down to is getting only what you really need in a system, rather than spending an extensive amount of money on unnecessary parts. Also, I could go on and on about what parts fit which lifestyle the best, but I probably should keep this article under three pages…. So, next, let’s talk about the building process!
Now, the moment you’ve been waiting for. You have all of your parts, and you are ready to begin. But just before you start building, let’s do a quick sanity check to save you hours of your time. First off, make sure you have a clean workspace that is large enough to support a massive PC on top of it. Next, be sure to be standing on a surface that isn’t carpet. As you will build up static electricity over time, if you touch any of your parts that are weak against static electricity, you could permanently fry that part. If you are standing on carpet, I do recommend an anti-static wristband so you can stay constantly grounded the entire time. Now let’s actually begin!
First, locate your motherboard box and take out everything that is inside, especially the motherboard and manual. Now once you have everything out of the box, place your motherboard on top of that box, as that provides a static resistant workstation. Next, locate your CPU. This is probably the most delicate part of your entire computer because if you break just one of the pins or scratch one of the nubs on the bottom, you could ruin that part. So, unlock and lift up the handle on the CPU socket. Next, line up the golden triangle on your CPU with the triangle on your motherboard, then place it in with no force; it should just fall right into place. The last step is to lock and put the handle back on the socket, and you are good! Congratulations, you completed the most stressful part.
Now onto RAM; depending on your motherboard, you could have any number of RAM sockets, but the average amount is four, so I’m going to use that as an example. Also, the majority of people install two sticks of RAM, so I’ll also use that as an example. To put the RAM in the correct placement, you first have to unlock the second and fourth channel. Then just put them in one at a time – you might have to use a little force. Once you hear a little click, that means you have correctly installed your RAM.
The next step is to place your CPU cooler onto your CPU. Now, this is a step I will mostly not have much for, as all coolers are completely different. So, consult the manual that came with your cooler. Once you have it installed, be sure to install the wire onto the header that is meant for the CPU fan. This step is only for people that have it, but if you have an SSD in the form of a little stick called an M.2, this is the time to install it onto your motherboard. Now that we have everything that directly is put into the motherboard setup, we have to place it in the case. Before placing your motherboard into your case, you have to do two steps. If your motherboard has an external I.O shield, be sure to insert that into your case before dropping the motherboard into the case. Next step is to install the motherboard standoffs – these are to provide a little room between the back of the motherboard and the case, so no scratching happens. Once you have those screwed in, place your motherboard on the standoffs and screw the motherboard into the case.
Next on our agenda is plugging in all of the case fans and front USB ports into the motherboard. There should be little wires coming out of the case, so all you have to do is plug those into the corresponding ports on the motherboard. It goes basically the same way for the fans – just plug them into the closest fan port near them. Then, there’s the power supply. F first, connect all of the wires to the power supply that you will need for all of your parts. Some power supplies will have all of their wires permanently plugged in, though. Then, route the cables through the PC to where they will be plugged into; this will save so much sanity because we have more room. So far, the only cables you will actually need to plug into anything else is the motherboard, so be sure to do that.
We also have hard drives if you have any. Open your drive cages and just screw the hard drive into one of them. Then, connect the SATA power cable from your power supply into your hard drive and plug another SATA cable into the port on the motherboard. This will allow the hard drive to send data to your computer and also be powered. This process additionally works the exact same if you have a SATA SSD. Lastly, unlock the PCIe port on the motherboard and unscrew the little cages on the side of your case to make room for the graphics card. Then slide the graphics card in until you hear a click. You can now plug the power cable from the power supply into the graphics card.
It is time for the moment of truth. Plug in your mouse, keyboard, and power cables into your computer. Also connect your graphics card to your monitor – do not use the HDMI port on the motherboard; it will not output any video if you do. Then, hit the power button. If it boots, you built your own PC! Just install your operating system and you have completed your build!
I hope you did enjoy this rather long article. It was nice writing about something other than just a game I like. Anyways, thank you as always for reading! Have a good day.
!